
DIY Tiling
Tile Laying Patterns
Choosing a tile laying pattern is so much fun! There are a few things to consider when selecting your tile laying pattern, which we run through here plus give you some funky ideas and inspiration along the way.
| 1. Horizontal stack |
| 3. Horizontal herringbone |
| 5. Double herringbone |
| 7. Offset |
| 9. Vertical brick bond |
| 11. Vertical stack alternating |
| 13. French pattern |
| 15. Chevron |
| 17. Laying mosaics |
| 2. Horizontal brick bond |
| 4. 45-Degree herringbone |
| 6. Step ladder |
| 8. 45-Degree brick bond |
| 10. Vertical stack |
| 12. Cross hatch |
| 14. Random colours |
| 16. Mixed sizes & shapes |

In this section, Kyal & Kara help us with the super fun task of choosing your tile laying pattern.
Click on any laying pattern below and we’ll take you directly to our information and tips. Come back to this index at any time if you need more information.
| 1. Horizontal stack | 2. Horizontal brick bond |
| 3. Horizontal herringbone | 4. 45-Degree herringbone |
| 5. Double herringbone | 6. Step ladder |
| 7. Offset / Staggered Bond | 8. 45-Degree brick bond |
| 9. Vertical brick bond | 10. Vertical stack |
| 11. Vertical stack alternating | 12. Cross hatch |
| 13. French pattern | 14. Random colours |
| 15. Chevron | 16. Mixed sizes & shapes |
| 17. Laying mosaics |
Kyal & Kara help us with the super fun task of choosing your tile laying pattern.
Click on any laying pattern below and we’ll take you directly to our information and tips. Come back to this index at any time if you need more information.
| 3. Horizontal herringbone |
| 5. Double herringbone |
6. Step ladder |
| 7. Offset / Staggered Bond |
| 9. Vertical brick bond |
10. Vertical stack |
| 11. Vertical stack alternating |
12. Cross hatch |
| 13. French pattern |
14. Random colours |
| 15. Chevron |
| 17. Laying mosaics |
|
11. Vertical stack alternating 13. French pattern 15. Chevron 17. Laying mosaics |
6. Step ladder 10. Vertical stack 12. Cross hatch 14. Random colours |
Our Hot Tip: Keen to see more of Kyal & Kara's #ichosebeaumonts renovation projects? Check them out here and get inspired!
Let’s Explore The Many Different Patterns You Could Consider And What Tiles They Are Best Suited To
When choosing a tile laying pattern, a great place to start is considering what you want to achieve in the space. If you want your ceiling to appear higher, then lay your tiles vertically to draw the eye up. Or if you would like to widen the appearance of a small room, then laying a horizontal brick bond with a slim rectangular shaped tile can help give this illusion. Essentially, the line you lay your tiles in will draw the eye to that focal point.
Perhaps you want a sleek and simple look that doesn’t vie for attention with other elements in the room, such as a vanity. The traditional stack laying method is ideal for this classic look, easily melding into the background so another hero piece can take centre stage. Or on the other hand, you can create a showstopping feature wall that WOW’s by putting a little more time and effort in with a basketweave laying pattern. And don’t forget, you can create a space that’s truly unique by combining tile laying patterns too!
Our Hot Tip: If you’re feeling overwhelmed, a good place to start is with the most common types which are stack, brick bond, herringbone or staggered.
Horizontal Stack
The most popular and simplistic tiling pattern sees your tiles laid out in straight lines to form a neat grid. Linear looks are hot right now, so if you want to take this tile laying pattern to a whole new on-trend level, then lay them vertically! Why not try Beaumonts white subways to the walls with a contrasting charcoal grout to really accentuate the shape. And because the tiles also line up with the edges of your wall and floor this layout is perfect for a DIY project, especially if it’s your first time.
Our Hot Tip: Grout colour can completely transform your look! Find out what's trending in grout colours and our expert tips and tricks for choosing the best grout for your project.


Horizontal Brick Bond
Tiles in a brick bond or stretcher bond pattern are laid out in rows whereby each row offsets half a tile length from the row on either side of it. Just picture how bricks are laid in a wall and you’ve got it. This laying pattern is suitable for small tiles, and as the traditional method for laying subway tiles, the brick bond pattern creates a staggered look that is still cohesive and pleasing without the regimented order of a strict stacked pattern.
Brick bond can be horizontal, vertical, or even diagonal. Staggered bond (sometimes called stretcher bond, offset or 1/3 bond) is very similar, except the tiles overlap the tile above by at least one quarter instead of half, creating a softer, more natural look.
For tiles 300x600 or larger only ever use a staggered brick bond as this will avoid lipping.
Our Hot Tip: Once you've finished your project, did you know you could WIN a tile voucher to go towards your next project? Enter our monthly #ichosebeaumonts competition for your chance to win! Click here to enter.
Horizontal Herringbone
One of the most striking and effective tile patterns for any wall or floor, big or small is herringbone. Perfect for when you want to spice up your space, this pattern is achieved by laying slim rectangular tiles at a 45-degree angle in a V-shape to create a zig-zag or ‘fishbone’ effect. If you’re tiling a wall, the first thing to decide is whether your pattern will run across the wall, or up and down it. If you’re tiling a floor, think about the direction of the room you want to highlight. Do you want to accentuate the length or width of your space?
If you love the herringbone look, but you aren't quite ready to start cutting and laying tiles at 45 degrees, we have some great herringbone mosaic sheets in a range of styles - perfect for DIY tiling but do not compromise on the traditional style and design.
Our Hot Tip: Need more inspiration? We've got it sorted! Explore our TV pages here featuring a stack of TV shows who have said #ichosebeaumonts including The Block, The Living Room, House Rules and more!


Herringbone 45-Degree
Although the traditional laying direction of herringbone (horizontal) is pictured above, you can think outside the box lay your herringbone pattern sideways or diagonally. Lay your tiles in a direction that plays to your rooms dimensions and use your laying pattern to emphasise certain features.
Our Hot Tip: Consider your tile's variation rating when planning your tile laying pattern. For everything you need to know about tiles including variation ratings click here.
Double Herringbone
As the name suggests, the double herringbone laying pattern involves two tiles at a time - an extraordinary way of elevating the original striking herringbone pattern. Slightly more complex than the standard herringbone pattern, we suggest using a tiler to install your tiles in a double herringbone pattern.
Just like standard herringbone, double herringbone can be laid horizontally or 45-degree - the choice is yours!
Our Hot Tip: Need a tiler? We can help! Thanks to our Trade Club, we have a huge database of tilers ready to help you. Find your tiler here.


Step Ladder
A close cousin to herringbone tile patterns - thanks to its suggestions of direction and movement, the step ladder pattern involves alternating horizontally and vertically laid rectangular tiles. When the eye notices just the tiles in one direction, the effect is of a series of tiles stepping up and up diagonally across the surface.
Our Hot Tip: Unsure what laying pattern to choose? Receive free personalised style advice by taking our fun 3-minute What's My Style Quiz here.
Our Hot Tip: Once you've finished your project, did you know you could WIN a tile voucher to go towards your next project? Enter our monthly #ichosebeaumonts competition for your chance to win! Click here to enter.
Offset or Staggered Brick Bond
This pattern choice is the best option for any rectangular tile larger than 300x600 and produces a softer and more natural look.
Tiles are laid out in rows whereby each row offsets by at least one quarter instead of half. Any type of offset between 25-33% works for this pattern and sizes over 300x600.
Staggered brick bond is great if you are looking to lay timber-look tiles in a traditional way as it gives the most realistic timber floor appearance.
Timber-look tiles also look great in herringbone and stepladder patterns.
Our Hot Tip: Unsure what laying pattern to choose? Receive free personalised style advice by taking our fun 3-minute What's My Style Quiz here.


45-Degree Brick Bond
Almost any tile can be laid at an angle to instantly create a more interesting look. Rotating the laying pattern 45 degrees of a long rectangle such as a timber-look plank tile will add modern pizzazz and can help a small room appear larger. Square tiles laid at a 45-degree angle will give a diamond shape appearance and traditional look. Just remember, because the tiles no longer line up with your walls, setting tiles on the diagonal increases the number of cuts you have to make around the perimeters, so be sure to factor this into your purchasing quantities.
Our Hot Tip: Need a tiler? We can help! Thanks to our Trade Club, we have a huge database of tilers ready to help you. Find your tiler here.
Vertical Brick Bond
Like all vertical laying patterns, choose the vertical brick bond pattern when your goal is to make your room feel taller. This pattern is beautiful in larger tiles as pictured here but also works with smaller subway tiles.
If you are hoping to avoid making the room too busy, however, we would recommend using this pattern with larger tiles, or create a small feature with coloured subway tiles and use plain, lighter colour tiles for the rest of the wall.
Just a note, for any rectangular tile larger than 300x600 we recommend a vertical staggered brick bond.
Our Hot Tip: Once you've finished your project, did you know you could WIN a tile voucher to go towards your next project? Enter our monthly #ichosebeaumonts competition for your chance to win! Click here to enter.


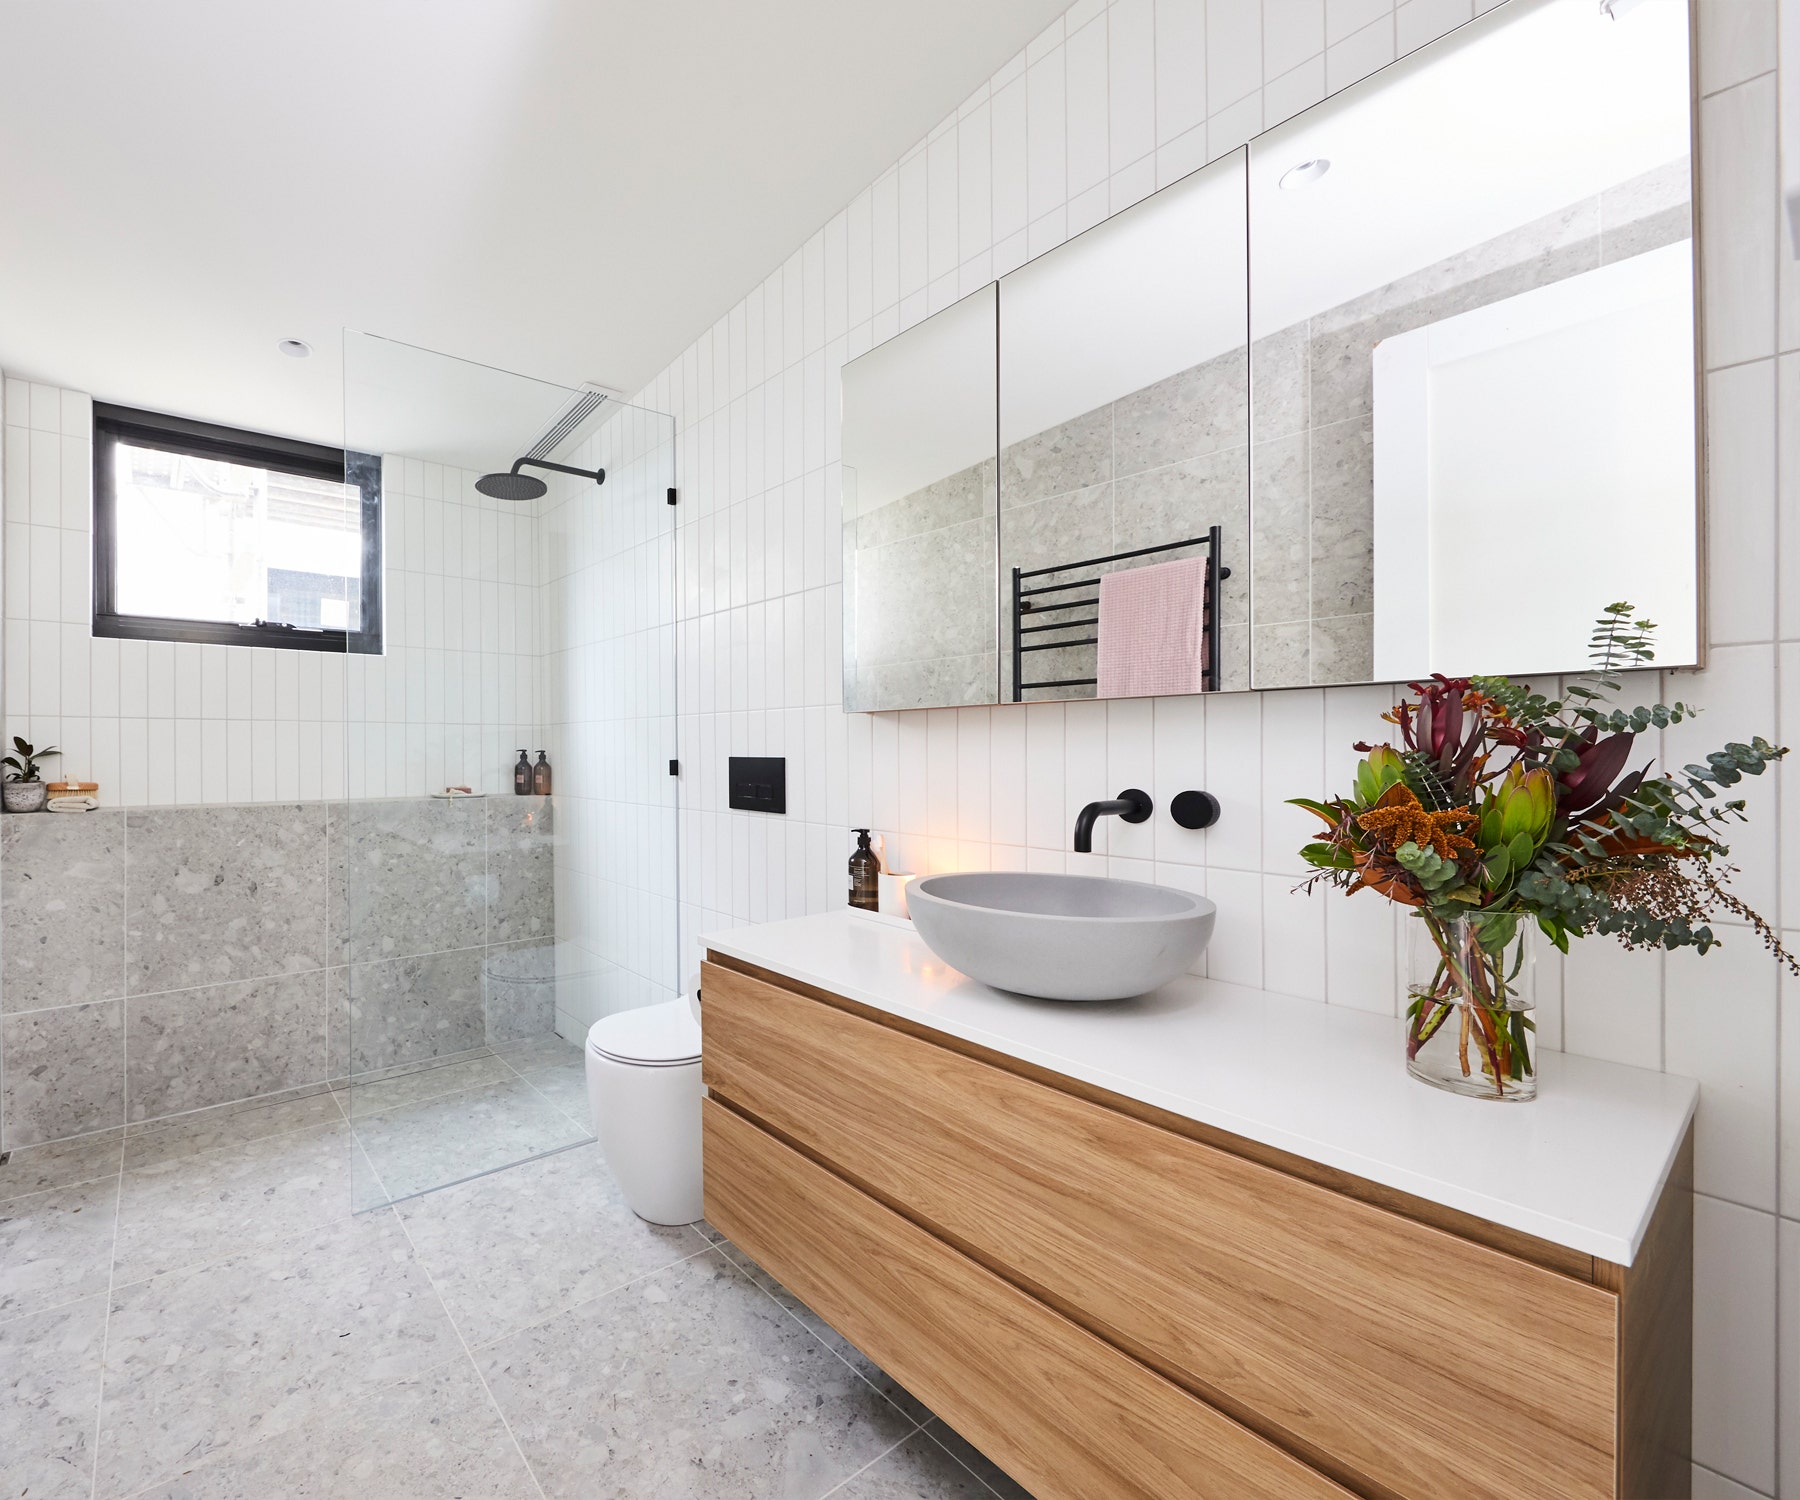
Vertical Stack
Vertical stack pattern is trending at the moment and it's not hard to see why with the sleek lines and opportunity to make a bold statement with contrasting grout or a more refined look with matching grout.
This laying pattern works wonderfully on splashbacks to draw the eye upwards and elevate the space or alternatively, in a bathroom.
Like the vertical brick bond pattern, use larger tiles down to smaller subways - the choice is yours! Just bear in mind that smaller tiles will obviously mean more grout lines so consider if your room might look busy and remember the more grout lines = the more cleaning. Our hot tip to get around this is to use a larger tile halfway up your wall (typically where the majority of the soap scum will be) and then use your subways for the rest of the wall up to the ceiling.
Our Hot Tip: Grout colour can completely transform your look! Find out what's trending in grout colours and our expert tips and tricks for choosing the best grout for your project.
Vertical Stack Alternating
This laying pattern packs a punch! As you can see from the image of Kyal & Kara's family laundry, they chose a smaller subway tile and relied on this laying pattern to add detail.
The smaller the tile, the busier this pattern will make your space so keep that in mind and choose your wall tiles accordingly! Of course if you only have a small space to tile such as a splashback, you can have fun with a smaller sized tile and your grout colour.
Our Hot Tip: Keen to see more of Kyal & Kara's #ichosebeaumonts renovation projects? Check them out here and get inspired!


Cross Hatch
This pattern also answers to Basket Weave, because the finished effect is like a woven basket. This simple and effective layout is created by laying rectangular tiles in pairs rotating each pair 90 degrees to create the impression they weave under and over each other.
Cross hatch is an easy pattern to achieve for any DIYer and can be taken to another level by using two different coloured tiles. You can also get the effect by alternating tiles with a strong grain.
Our Hot Tip: Unsure what laying pattern to choose? Receive free personalised style advice by taking our fun 3-minute What's My Style Quiz here.
French Pattern
At first glance, French Pattern may look random, but over time the intricate pattern and careful planning become apparent. Using four different sizes of tiles, this modular pattern is popular for outdoor areas and is often seen with travertine tiles. This pattern often comes as part of an already predetermined pack of modular tiles.
Our Hot Tip: Need a tiler? We can help! Thanks to our Trade Club, we have a huge database of tilers ready to help you. Find your tiler here.

Random Colours
With a random pattern, simply mix different colours of the same tile and arrange as randomly as you like. A random colour mix works fantastically well with subway tiles and especially hexagons - even on floors!
Our Hot Tip: Need more inspiration? We've got it sorted! Explore our TV pages here featuring a stack of TV shows who have said #ichosebeaumonts including The Block, The Living Room, House Rules and more!

Chevron
Chevron is another close relative of herringbone, but with a small change that makes a big difference to the overall effect. Instead of using purely rectangular tiles, the ends of each tile in this pattern meet the sides at a 45 degree or 30-degree angle. This parallelogram shape creates a more angular and unique layout.
Remember when you’re planning your tile layout, it’s always a good idea to “dry lay” your tiles before sticking them down to make sure you’re 100% happy with the results.
Be sure to share your layout ideas with any of our expert staff when choosing your tiles. Depending on the pattern and tiles you choose we can help you plan out the quantities you need, the cuts and anything else you need for a job you’ll love for many years to come.
Our Hot Tip: If you love the look of the chevron pattern, we have a range of mosaics and timber-look tiles that are in the chevron pattern to help you easily achieve the look.
Mixed Sizes & Shapes
Another option for adding WOW factor or a point of difference in your design is by mixing sizes. For example, a lot of our smaller tile ranges come in multiple size options such as our Devonshire Superwhite Structured Gloss range which is available in a 150x150mm & 150x75mm size. Order the two and ask your tiler to mix them up as they are laid. You can create your own pattern that's slightly considered or just leave it to be completely random but we recommend you dry lay your mixed size pattern before it's laid.
If you've fallen in love with a rectified tile that's only available in the one size, ask if your tiler can cut them at random sizes for a funky pattern - we wouldn't advise doing this if your tile has an uneven, handmade look to it as the cut edges will be clean and won't have the uneven edges to them.
It’s also possible to create patterns that mix tiles that are of different sizes and shapes. Because of the added level of intricacy, these patterns are often most effective on larger floors like in living rooms or outdoors. That said, they can also make great features if you get the proportions right.


Our Hot Tip: Once you've finished your project, did you know you could WIN a tile voucher to go towards your next project? Enter our monthly #ichosebeaumonts competition for your chance to win! Click here to enter.

Our Hot Tip: Grout colour can completely transform your look! Find out what's trending in grout colours and our expert tips and tricks for choosing the best grout for your project.
Laying Mosaics
Whilst most mosaics pack a real punch with beautiful colour and intricate detailing to each sheet, you can still consider adding another dimension to your space with their laying direction. No need to follow the crowd when it comes to mosaics - why not consider laying them sideways or upside down?
If perhaps your mosaics are a repeated colour and shape such as plain white penny rounds, obviously the laying direction won't change the look, BUT, funky grout colour and how you decide to finish the mosaic top will allow you to add a touch of pizzazz.

